

Creating a Christmas garland that feels rich, full, and high-end isn’t about spending a fortune—it’s about layering the right elements with intention. A luxurious garland instantly makes your entryway, mantel, staircase, or dining room feel festive and inviting. And the best part? You can craft an expensive-looking garland using simple materials and smart styling techniques.
In this guide, you’ll learn how to build a designer-style garland from the base up—using texture, greenery variety, and thoughtful accents to achieve that full, premium look you see in magazines and Pinterest boards.
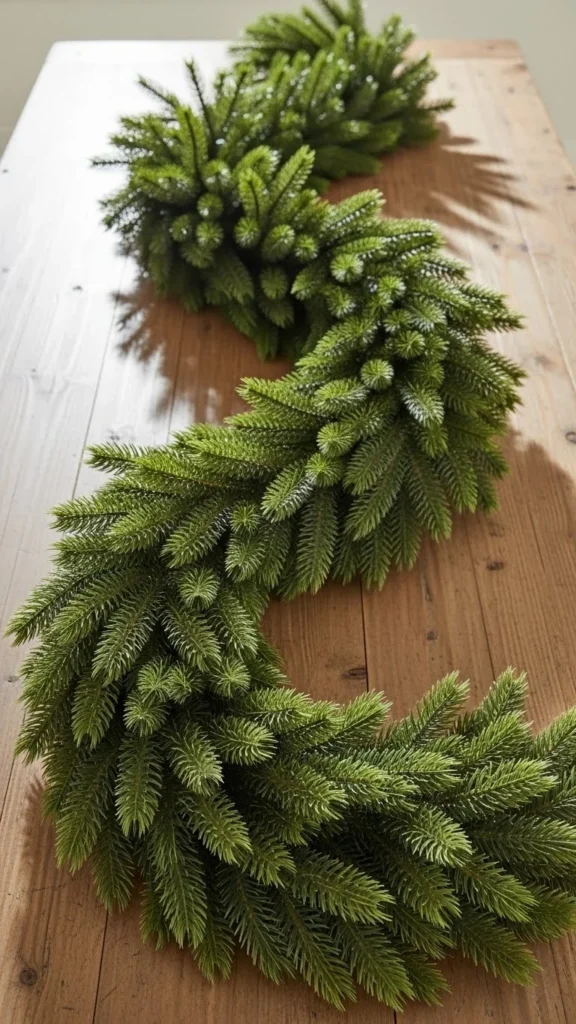
Start With a Full, High-Quality Base
The secret to an expensive-looking garland is a sturdy, full foundation. Whether you choose real or faux greenery, the base matters.
- Look for garlands marked “extra full” or “multi-needle.”
- Choose options that include mixed textures like spruce, fir, and pine.
- Aim for at least 9 feet if you’re draping a mantel or staircase for that cascading effect.
ImageUploadMedia LibraryInsert from URL
Fluff the branches one by one. Pull them upward, outward, and angled for movement. This alone can make a $20 garland look three times the price.
Layer in Multiple Types of Greenery
A designer garland never relies on a single type of branch. Mixing greenery creates dimension, depth, and a realistic touch—especially with faux materials.
Great add-ins include:
- Cedar picks
- Eucalyptus stems
- Magnolia leaves
- Frosted pine sprigs
- Juniper branches
Tuck these stems into the base, angling everything in the same direction to keep your garland visually cohesive.
ImageUploadMedia LibraryInsert from URL
Use wire to secure any pieces that feel loose. Don’t be afraid to layer generously—variety is what gives garlands that lush, magazine-worthy look.
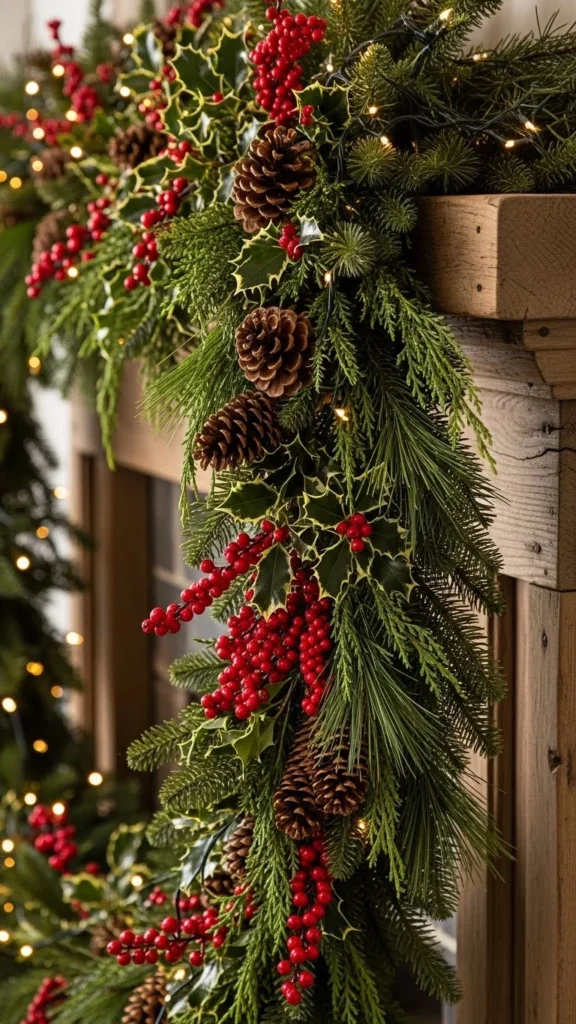
Add Natural Elements for Texture and Warmth
Once your greenery feels full, bring in natural accents to add personality and charm. These elements create that high-end, organic feel that never goes out of style.
Try adding:
- Pinecones
- Dried orange slices
- Wooden ornaments
- Cinnamon sticks
- Berries (muted, not too bright)
- Feather accents
Cluster items in groups of three for a balanced, designer finish. Spread them evenly from end to end.
This is the moment your garland starts feeling truly “lush”—it’s the texture that elevates it from basic to breathtaking.
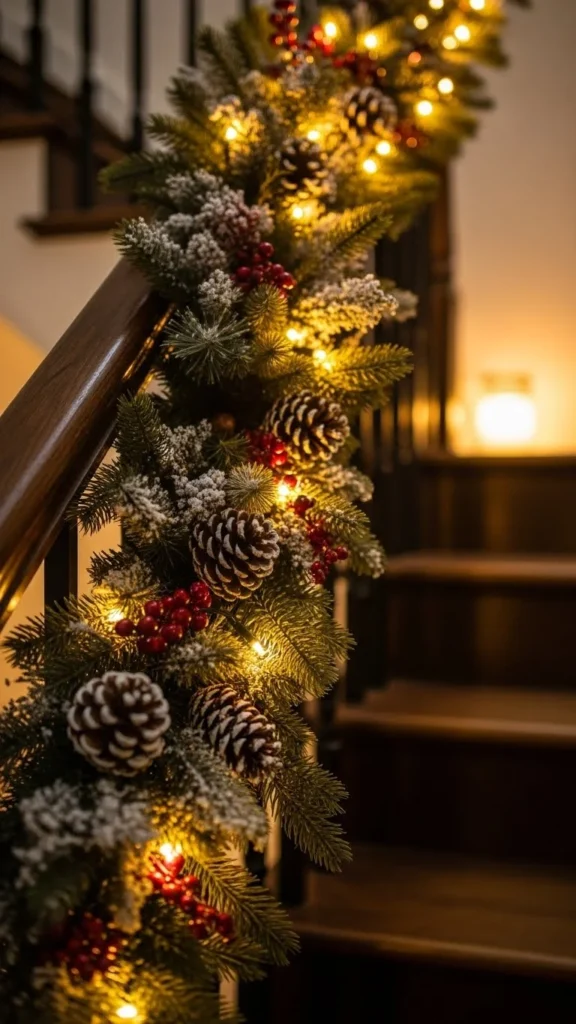
Incorporate Soft Lighting That Glows, Not Glares
Lighting is what makes your garland come alive. Instead of harsh, bright lights, go for warm LED micro-lights or fairy lights.
Tips for lighting placement:
- Wrap the lights loosely through the center of the garland.
- Let some bulbs sit deeper inside for a soft glow.
- Add a second strand for extra sparkle without overpowering the greenery.
ImageUploadMedia LibraryInsert from URL
Lights add richness and depth, especially at night. They also help your garland look luxe from every angle.
Choose Elegant Ribbon to Tie the Look Together
Ribbon is the finishing touch that instantly makes a garland feel high-end. Go for materials that drape well and look expensive.
Beautiful choices include:
- Velvet ribbon
- Linen ribbon
- Thick satin ribbon
- Wired-edge ribbon for easy shaping
Cut multiple long pieces and weave them throughout the garland instead of wrapping a single continuous strand. This gives movement and prevents the ribbon from feeling flat.
Form loose waves that tuck in and out of the greenery for a natural, flowing look.
Style Your Garland Like a Designer
Once your garland is built, it’s all about how you display it. Placement plays a major role in achieving that elevated look.
Here are easy styling tricks:
- Let the ends cascade down for a dramatic effect.
- Add command hooks or sturdy nails for seamless draping.
- Layer two garlands together if your space is large or your mantel is wide.
- Anchor the center so it dips slightly—this creates that classic swooped silhouette.
If you’re decorating a dining table, lay the garland down the center and lift some branches upward for shape. Add candles (unscented for safety) and simple accents for a curated finish.
Keep It Balanced Without Overcrowding
With so many gorgeous elements to choose from, it’s easy to go overboard. The trick is striking that perfect balance between full and cluttered.
Ask yourself:
- Is the greenery still the star?
- Do the accents enhance the look or distract?
- Is the ribbon visible but not dominating?
Step back and view the garland from different angles. Adjust, fluff, and edit until everything feels harmonized.
Final Thoughts
A lush, expensive-looking Christmas garland comes down to thoughtful layering, realistic greenery, natural textures, and warm lighting. With a bit of creativity and these simple techniques, you can transform any space into a festive showstopper.
Ready to try this at home? Save this guide for later and create your own stunning garland this season!Move upMove downToggle panel: Yoast SEO
Focus keyphraseHelp on choosing the perfect focus keyphrase(Opens in a new browser tab)
Get related keyphrases(Opens in a new browser tab)
Search appearance
Determine how your post should look in the search results.Preview as:Mobile resultDesktop result
Url preview:
decorviewer.comdecorviewer.com
SEO title preview:
How to Create a Lush Christmas Garland That Looks Expensive – decorviewer.com
Meta description preview:
Dec 15, 2025 - “Learn how to create a Christmas garland that looks rich and full using simple materials. Easy steps for crafting a high-end, festive holiday accent.”
SEO titleGenerate SEO titleInsert variable
Title Page Separator Site title
Slug
Meta descriptionGenerate meta descriptionInsert variable
“Learn how to create a Christmas garland that looks rich and full using simple materials. Easy steps for crafting a high-end, festive holiday accent.”
SEO analysisGoodHow to create a Christmas garland
Add related keyphrasePremiumTrack SEO performance
Content blocksNew
Internal linking suggestionsPremium
Cornerstone content
Advanced
Insights
Move upMove downToggle panel: WPCode Page ScriptsMove upMove downToggle panel: Scripts
| Header Scripts | Output before the closing head tag, after sitewide header scripts. |
|---|---|
| Body Scripts | |
| Body Scripts Position | Bottom: before closing body tag Top: after opening body tag |
PostBlock
How to Create a Lush Christmas Garland That
Creating a Christmas garland that feels rich, full, and high-end isn’t about spending a fortune—it’s about layering the right elements with intention. A luxurious garland instantly makes your entryway, mantel, staircase, or dining room feel festive and inviting. And the best part? You can craft an expensive-looking garland using simple materials and smart styling techniques.
In this guide, you’ll learn how to build a designer-style garland from the base up—using texture, greenery variety, and thoughtful accents to achieve that full, premium look you see in magazines and Pinterest boards.
Start With a Full, High-Quality Base
The secret to an expensive-looking garland is a sturdy, full foundation. Whether you choose real or faux greenery, the base matters.
- Look for garlands marked “extra full” or “multi-needle.”
- Choose options that include mixed textures like spruce, fir, and pine.
- Aim for at least 9 feet if you’re draping a mantel or staircase for that cascading effect.
Fluff the branches one by one. Pull them upward, outward, and angled for movement. This alone can make a $20 garland look three times the price.
Layer in Multiple Types of Greenery
A designer garland never relies on a single type of branch. Mixing greenery creates dimension, depth, and a realistic touch—especially with faux materials.
Great add-ins include:
- Cedar picks
- Eucalyptus stems
- Magnolia leaves
- Frosted pine sprigs
- Juniper branches
Tuck these stems into the base, angling everything in the same direction to keep your garland visually cohesive.

Use wire to secure any pieces that feel loose. Don’t be afraid to layer generously—variety is what gives garlands that lush, magazine-worthy look.
Add Natural Elements for Texture and Warmth
Once your greenery feels full, bring in natural accents to add personality and charm. These elements create that high-end, organic feel that never goes out of style.
Try adding:
- Pinecones
- Dried orange slices
- Wooden ornaments
- Cinnamon sticks
- Berries (muted, not too bright)
- Feather accents
Cluster items in groups of three for a balanced, designer finish. Spread them evenly from end to end.
This is the moment your garland starts feeling truly “lush”—it’s the texture that elevates it from basic to breathtaking.
Incorporate Soft Lighting That Glows, Not Glares
Lighting is what makes your garland come alive. Instead of harsh, bright lights, go for warm LED micro-lights or fairy lights.
Tips for lighting placement:
- Wrap the lights loosely through the center of the garland.
- Let some bulbs sit deeper inside for a soft glow.
- Add a second strand for extra sparkle without overpowering the greenery.
Lights add richness and depth, especially at night. They also help your garland look luxe from every angle.
Choose Elegant Ribbon to Tie the Look Together
Ribbon is the finishing touch that instantly makes a garland feel high-end. Go for materials that drape well and look expensive.
Beautiful choices include:
- Velvet ribbon
- Linen ribbon
- Thick satin ribbon
- Wired-edge ribbon for easy shaping
Cut multiple long pieces and weave them throughout the garland instead of wrapping a single continuous strand. This gives movement and prevents the ribbon from feeling flat.
Form loose waves that tuck in and out of the greenery for a natural, flowing look.
Style Your Garland Like a Designer
Once your garland is built, it’s all about how you display it. Placement plays a major role in achieving that elevated look.
Here are easy styling tricks:
- Let the ends cascade down for a dramatic effect.
- Add command hooks or sturdy nails for seamless draping.
- Layer two garlands together if your space is large or your mantel is wide.
- Anchor the center so it dips slightly—this creates that classic swooped silhouette.
If you’re decorating a dining table, lay the garland down the center and lift some branches upward for shape. Add candles (unscented for safety) and simple accents for a curated finish.
Keep It Balanced Without Overcrowding
With so many gorgeous elements to choose from, it’s easy to go overboard. The trick is striking that perfect balance between full and cluttered.
Ask yourself:
- Is the greenery still the star?
- Do the accents enhance the look or distract?
- Is the ribbon visible but not dominating?
Step back and view the garland from different angles. Adjust, fluff, and edit until everything feels harmonized.
Final Thoughts
A lush, expensive-looking Christmas garland comes down to thoughtful layering, realistic greenery, natural textures, and warm lighting. With a bit of creativity and these simple techniques, you can transform any space into a festive showstopper.
Ready to try this at home? Save this guide for later and create your own stunning garland this season!

Leave a Reply